

Deep Chinook demands a downrigger, flasher, and 20 to 24 inch leader. No downrigger on board? Divers and planers close the gap fast. Match your flasher size to the water column you’re fishing, hold speed between about two and three and a half miles per hour depending on species, and the rest of this guide walks you through every rig, knot, and setback that makes it work.
TL;DR:
- Use a leader length of 20 to 24 inches and match your flasher size to water depth and clarity, with 11 inch for normal and 14 inch for deep or murky water.
- When fishing without a downrigger, divers such as Dipsy or inline divers can effectively reach the same depths, with adjustments to line-out and setback.
- Lead-core line offers predictable depth control by color count, with faster speeds riding shallower and slower speeds going deeper, ideal for mixed-depth spreads.
- Proper bait presentation requires angle cuts, steady roll, and fluorocarbon leaders of 30 to 36 inches, with re-cutting the bait if the spin is lazy or erratic.
- Trolling speeds of 2.0 to 3.0 mph for Chinook and 2.5 to 4.0 mph for Coho are optimal, with speed and setback adjustments critical for triggering strikes.
Table of Contents
- Building a Downrigger Rig for Deep Chinook
- When Should You Use Divers Instead of Downriggers?
- What Is the Lead-Core Approach for Great Lakes Salmon?
- How Do You Rig Cut-Plug Herring and Mooching Baits?
- Which Leader Length and Knot Should You Use for Each Species?
- What Trolling Speed and Spread Actually Trigger Strikes?
- Nick’s Rigging Workflow: What I Pre-Tie and Why
- How Do You Keep Trolling Gear Safe and Working All Season?
- How Does Freshwater Salmon Trolling Differ From Ocean Setups?
- How Should You Match Gear to Chinook, Coho, or Mixed-Bag Trolling?
- Publisher Perspective: Why These Rigs Work and When to Adapt Them
- How Highclasstackleco Helps You Rig Faster on the Water
- Sources
Building a Downrigger Rig for Deep Chinook
Deep Chinook don’t care how nice your boat looks. They care about presentation, and the downrigger rig is the most precise way to deliver one. The standard sequence runs like this: downrigger ball, then 100 to 200 feet of main line, a release clip, a 6 to 10 foot fluorocarbon leader joined with an FG knot, a flasher, and finally a 20 to 24 inch leader to your lure or bait.
That short leader behind the flasher matters more than most anglers realize. Too long and you lose the flasher’s action. Too short and the lure may interfere with the attractor’s movement.
Here’s the build order and what to run at each junction:
- Main line: 40 to 65 lb braid or downrigger cable, spooled to at least 200 feet of working depth.
- Release clip: attach directly to the downrigger cable, adjustable tension for the strike you’re expecting.
- Top leader (6 to 10 feet): 30 to 40 lb fluorocarbon, tied to main line with an FG knot for a smooth, low-profile connection.
- Flasher: 11 inch standard for most Chinook water; step up to 14 inch when you’re fishing past 100 feet or in low-light, murky conditions.
- Bottom leader (20 to 24 inches): 20 to 30 lb fluorocarbon, hook tied with a Palomar knot.
For depth, lower the ball 5 to 10 feet above the fish mark on your sonar, not right on top of it. Salmon typically look up to feed, and a lure riding slightly above the school draws more strikes than one crashing through the middle of it. Saltwater Chinook trollers often run 10 to 12 lb balls to fight current and maintain a clean drop angle.
Pro Tip: Pre-tie your FG leader assemblies at home on a table, not on a rolling boat deck. That knot rewards a steady hand, and a calm kitchen counter beats a chop-tossed cockpit every time.
Carry two or three complete leader sets pre-rigged with swivels already attached. When a fish tangles gear or a flasher gets stripped of paint, you swap the whole assembly in under a minute instead of rebuilding from scratch on the water.
When Should You Use Divers Instead of Downriggers?
Not every boat carries downriggers, and honestly, you don’t always need one. Dipsy divers, inline divers, and planer boards get lures into the same water column with less hardware and more coverage per pass. They’re also the better call when you’re running four or five rods and need each one hunting a different depth without four downrigger booms cluttering the gunnel.
Here’s how to set them up right:
- Line choice matters first. Run 30 to 50 lb braid to your diver for minimal stretch and better bite detection, then step down to a fluorocarbon leader for stealth near the lure.
- Size your diver to depth. Larger divers dig deeper at the same speed and line-out distance; a size 1 Dipsy set on a moderate angle at 2.5 mph runs noticeably shallower than a size 2 on a hard angle.
- Measure setback and repeat it. Use a line counter reel or a marked line to note exactly how much line was out when a fish hit, then run every other rod to that same setback once you find the bite.
- Pair attractor to presentation. A flasher behind a diver adds flash and vibration for aggressive Chinook; a naked spoon or hoochie behind a diver works better for line-shy Coho in clear water.
Divers do lose some of the erratic attractor movement a downrigger provides, since the diver itself absorbs some of the flasher’s kick. Compensate with a slightly larger flasher or a longer leader to restore that action, an adjustment experienced trollers make instinctively once they’ve fished both systems side by side.
What Is the Lead-Core Approach for Great Lakes Salmon?
Lead-core line is the sleeper tool in salmon trolling, especially for Great Lakes anglers who want repeatable depth without a downrigger boom taking up rod space. The line sinks at a predictable rate per “color,” the 10-yard segments of dyed lead-core that anglers count out behind the boat.
More colors out means more depth, and speed changes that math. Run faster and the same number of colors rides shallower; slow down and it sinks deeper. Most anglers build a simple chart on their first few trips and stick to it once they know their boat’s typical trolling speed.
Rigging basics:
- Backing: 20 to 30 lb monofilament or braid, enough capacity for your reel plus the lead-core length you’re running.
- Connection: join backing to lead-core with an Albright knot, a compact splice that handles the diameter jump cleanly.
- Leader: 15 to 20 feet of fluorocarbon behind the lead-core, longer in clear water.
- Lure pairing: spoons and small plugs troll well straight off lead-core; add a small flasher if you want extra flash without changing your color count much.
Stack lead-core rods at different color counts alongside a diver or two, and you’ve built a full depth spread without a single downrigger.
How Do You Rig Cut-Plug Herring and Mooching Baits?
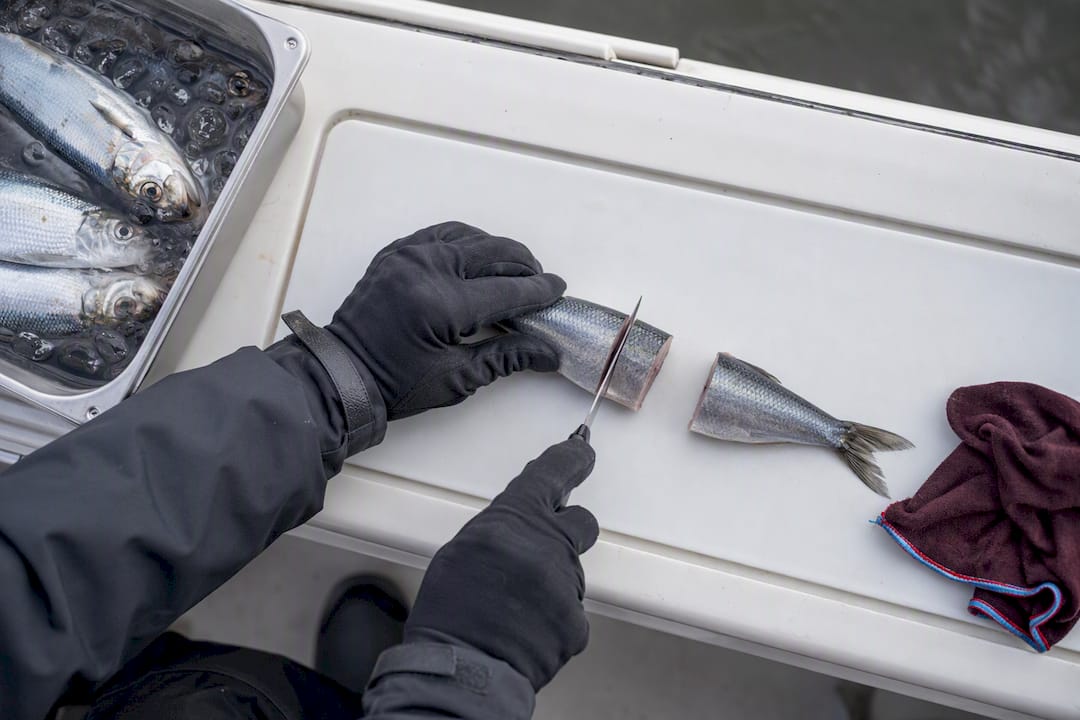
Bait still out-fishes hardware on plenty of days, and cut-plug herring remains the gold standard for a reason. The cut angle on the herring’s head creates the spinning roll that triggers strikes, and getting that roll right matters more than any other part of the rig.
Build the rig with a two-hook sliding or snelling arrangement: the lead hook sits through the cut face, the trailing hook rides free near the tail, connected by 4 to 6 inches of leader between them.
- Cut the herring at an angle through the head, angled slightly to promote spin.
- Test the roll boatside before dropping to depth, aiming for a steady roll about every couple of seconds.
- Use 20 to 30 lb fluorocarbon leader, roughly 30 to 36 inches, shorter behind a dodger and longer behind a flasher.
- Swap to a dodger instead of a flasher when you want subtler action that won’t overpower the bait’s natural roll.
Pro Tip: A herring that spins too fast usually means an overcut. Trim a little less angle off the next one instead of scrapping the whole bait.
If the roll looks lazy or lopsided after a few minutes trolling, don’t fight it. Re-cut a fresh bait. A properly rolling herring is worth more than a stubborn one you keep trying to salvage.
Which Leader Length and Knot Should You Use for Each Species?
Leader length isn’t a guess. It’s a spec that changes with attractor size and target species, and getting it wrong is one of the most common reasons a rig that looks right still doesn’t produce.
- Coho: run a smaller 8 inch flasher with a 14 to 18 inch leader, or roughly 36 inches for a naked spoon presentation without a flasher at all.
- Chinook behind a standard flasher: 20 to 24 inches off an 11 inch flasher covers most conditions.
- Deep-water big Chinook: step up to a 14 inch flasher and lengthen the leader to 24 to 30 inches to match the bigger attractor’s swing.
- Line test: 20 to 30 lb fluorocarbon handles most trolling, but bump to 40 lb around structure or when big fish are mixed with rockfish and other snag risks.
Knot choice at each junction affects how the whole rig behaves. Use an FG knot joining braid main line to a fluorocarbon top leader, a Palomar knot for hook connections, an Improved Clinch for swivel attachments, and a Non-Slip Loop knot when running a naked spoon so the lure swings freely instead of being pinned rigid.
Skip extra swivels and snaps wherever you can get away with it. Every piece of hardware adds a flash point and a failure point, and stealthy Coho in clear water notice more than most anglers give them credit for.
What Trolling Speed and Spread Actually Trigger Strikes?
Speed changes everything else on your rig. It’s not a minor variable, it’s the variable that decides whether your diver runs at the depth you think it does or ten feet shallower.
Chinook generally respond best between 2.0 and 3.0 mph, while Coho often want it faster, 2.5 to 4.0 mph. Measure your actual speed through the water, not just over ground, since current can throw GPS speed off by a full mile per hour or more. Watch your downrigger cable angle too; a steeper angle at the same line-out distance means you’re either running faster or fighting more current than you think.
- Space rods so lures don’t cross on turns; stagger depths by at least 10 feet between adjacent lines.
- Run planer boards to widen your spread without adding depth conflicts between rods.
- Try tacking, a deliberate zig-zag across the troll, which changes setback and depth rapidly and often triggers followers that have been trailing your lure without committing.
- When you get a hit, note the exact setback and depth, then run every other rod to match it before you do anything else.
Reading bait marks on your sonar tells you where fish are feeding, and that’s usually the depth worth setting first regardless of what the chart says salmon “should” be doing that day.
Nick’s Rigging Workflow: What I Pre-Tie and Why
Half of running an efficient trolling program happens before you leave the dock. Pre-tie your FG leader assemblies and spare flasher leaders at home, coil them onto leader boards, and label them by length so grabbing the right one takes seconds, not minutes.
Longer mooching rods, 9 to 10.5 feet, give you better hook clearance on the swing and absorb a Chinook’s first violent run better than a stiff shorter rod. On the water, the quick-change routine is simple: clip out the spent leader, clip in the pre-tied replacement, check the roll or the flasher spin, drop back to depth. If a flasher starts fouling or a leader kinks, don’t troubleshoot mid-troll. Swap it and diagnose later at the dock.
How Do You Keep Trolling Gear Safe and Working All Season?
A rig that fails at the worst moment usually failed weeks earlier and nobody checked. Inspect leaders for nicks and abrasion after every trip, especially the section closest to the flasher swivel where constant flash and vibration wear fluorocarbon thin over time.
Downrigger cables need regular attention too. Check the cable for fraying near the ball connection point, and replace it at the first sign of birdcaging, the frayed, flared look that means the cable’s internal strands are failing. A snapped cable under load near the boat is a genuine hazard, not just an inconvenience, especially with several rods fishing at once and lines crossing near the transom.
Keep the working area around your downrigger booms clear. A ball swinging free during a hard turn or sudden stop carries real weight and momentum, and it has no idea where your hands are. Store spare hooks and terminal tackle in a dedicated box rather than loose in a tackle drawer, both for organization and to avoid a nasty surprise reaching in for pliers.
Rinse reels, rod guides, and downrigger components with fresh water after every saltwater trip. Saltwater corrosion works fast on ball bearings inside swivels and reel drags, and a swivel that’s seized from corrosion defeats the entire purpose of running one. A quick freshwater rinse and a light reel oil after each outing adds years to gear that otherwise gets replaced twice as often as it should.
How Does Freshwater Salmon Trolling Differ From Ocean Setups?
Freshwater and saltwater salmon share the same basic rig logic, but the details shift enough that copying an ocean setup onto a lake or river without adjustment usually underperforms.
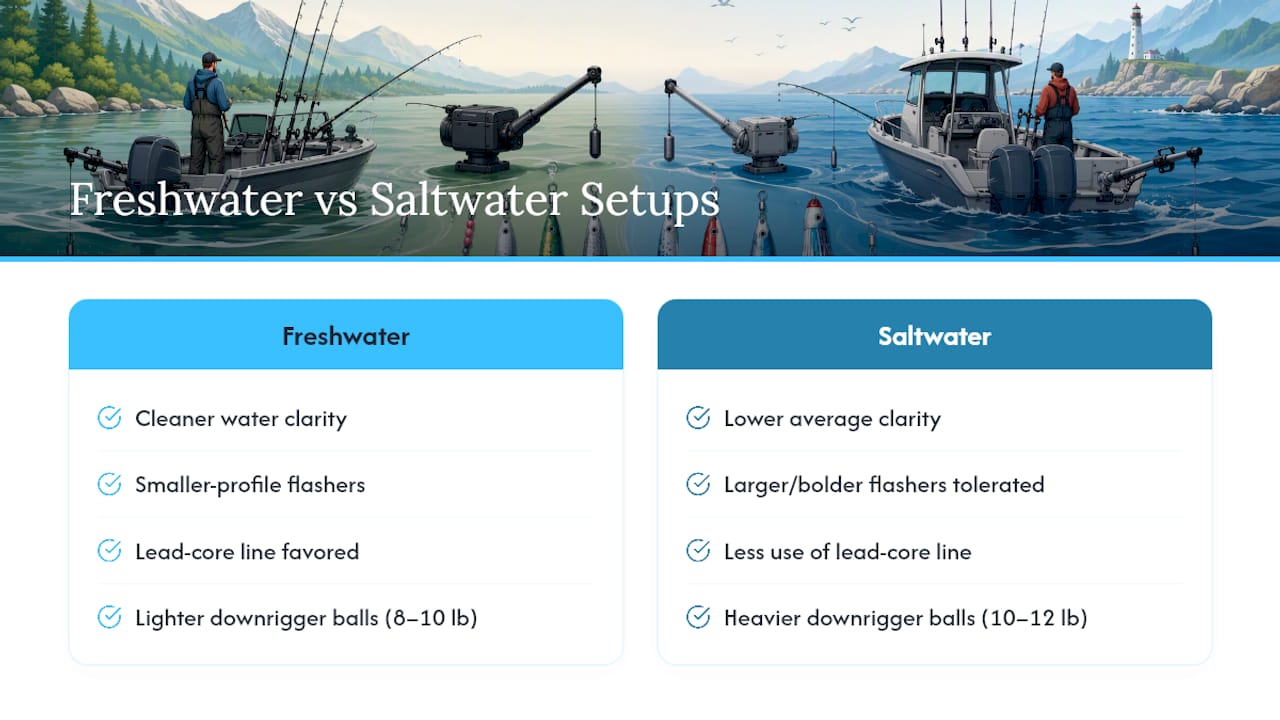
Freshwater trolling, especially on Great Lakes and Pacific Northwest reservoirs, leans harder on lead-core line and smaller profile flashers since water clarity tends to run cleaner than ocean water stirred by tide and swell. Downrigger balls also run lighter in freshwater, often 8 to 10 lbs versus the 10 to 12 lb balls common in saltwater current, since there’s less drag pulling the ball off its set angle.
Leader lengths often run slightly shorter in freshwater too, since clearer water means fish key in on subtler presentations and a shorter leader keeps the lure riding tighter to the flasher’s action without spooking fish that get a longer look at your gear. Saltwater Chinook, by contrast, often tolerate more hardware and a bolder presentation given lower average water clarity and more current-driven flash and movement already in the water.
Boat traffic and current patterns differ enough that setback replication matters even more in rivers, where current speed changes minute to minute compared to the steadier drift of open ocean trolling. What stays consistent across both environments is the core principle: match your attractor size and leader length to the water clarity and current you’re actually fishing, not the setup that worked somewhere else last season.
How Should You Match Gear to Chinook, Coho, or Mixed-Bag Trolling?
Rigging for the right species starts with knowing what that fish actually responds to, not just running whatever setup produced last season. Chinook favor bigger, bolder presentations, larger flashers, longer leaders, and baits or lures with more thump in the water, since they’re often holding deeper and need more attraction to commit from a distance.
Coho, by comparison, respond to speed and flash more than sheer size. A smaller flasher, a faster troll, and a shorter leader tend to out-fish a Chinook-scaled rig when Coho are the target, especially in the upper water column where these fish often chase.
Mixed-bag days, where both species are present, call for a middle-ground setup: a mid-size 11 inch flasher, a leader in the 20 to 24 inch range, and a moderate 2.5 mph troll that doesn’t fully favor either species but stays productive for both. Rod selection matters here too. A slightly heavier rod handles the added weight of downrigger gear and bigger Chinook-scale hardware better, while a lighter mooching rod shines when you’re specifically chasing acrobatic, lighter-biting Coho.
Line test should scale with the fish and the water, not the biggest fish theoretically possible. Running 40 lb leader for average-sized Coho just kills the lure’s natural action for no real benefit.
Publisher Perspective: Why These Rigs Work and When to Adapt Them
Most anglers guess at leader length and setback, then wonder why the guy two boats over is putting fish in the net. Replication beats intuition here. Copy an exact leader length, flasher size, and setback that’s producing, then hold it steady before you start experimenting.
Once you’ve got a proven baseline, adjust attractor size and leader length to water clarity and how that day’s fish are behaving. Dig deeper into Chinook-specific rigging or Coho setups once you’ve got the fundamentals locked.
— Nick
How Highclasstackleco Helps You Rig Faster on the Water
Every rig in this guide comes down to the same bottleneck: tying clean knots and swapping leaders fast enough to keep your gear in the water instead of on the tying bench. Pre-tied leader packs and terminal tackle collections are available to help remove that bottleneck, so you can fish a proven setup within minutes of leaving the dock instead of rebuilding rigs at 5 a.m. with cold hands.
Our pre-tied leaders use the same FG and Palomar knot connections covered above, tied consistently every time so you’re not troubleshooting a bad knot mid-troll. The terminal tackle and components collection covers the snaps, swivels, and hooks that hold these rigs together, and the component tackle box gives you a stocked kit if you’re building your setup from scratch this season. Head to the Highclasstackleco shop and grab what you need before your next trip out.
Sources
For deeper walk-throughs on specific rigs, see the rigging tutorial and cut-plug herring guide.
- Knots
- How to Go Trolling for Salmon: The Complete Guide for 2026
- Trolling For Salmon: A Complete How-To Guide To DIY 2026
- Salmon Trolling Rig Guide - Pro Fishing Rigs
0 comments